The Trend:
Tie Dye

WARNING: HIGHLY ADDICTIVE
What the High Street Has to Offer...

TOPSHOP
£45

TOPSHOP
£34

TOPSHOP
£34

URBAN OUTFITTERS
£45

URBAN OUTFITTERS
£50

URBAN OUTFITTERS
£40

MISS SELFRIDGE
£26
Throughout the high street this season, I'm sure you would have noticed the huge trend dangling from hangers. Tie dye seems to have sprung up everywhere, I'm thinking its the pre-festival fever kicking in. I for one shall confess that it has certainly taken me in its grasp. Armed with a free afternoon, a free house (I'm not sure Mumma BB would be my biggest fab as it can get messy,) and a true british summer day I took the opportunity to have a whirl myself, so here goes...

TRUE BRITISH SUMMER
First things first:
- Decide on your items
- Choice your dyes
- And pick up EVERY newspaper possible (this will act as damage control)
After raiding my wardrobe, ebay and the house cupboards I picked up a few bits and pieces to get me started.


MY RAIDED ITEMS
- Dyes
- Clothes
- Salt
- Bleach (if you want to lighten bits)
- Buckets
- Stick (to stir the dyes)
- Clothing pegs
- Kettle
- Measuring Jug
- Elastic Bands
- Rubber Gloves
- Spray bottle
- Scales (if you need to weigh your dye out)
Prepare the Dye
Follow the instructions on the packet
-I kinda improvised


DISSOLVE 50G OF DYLON INTO 500ML
BOILING WATER AND STIR UNTIL DISSOLVED
BOILING WATER AND STIR UNTIL DISSOLVED
MEASURE 200-250G OF SALT
POUR SALT INTO A BUCKET CONTAINING
3 LITRES BOILING AND 1 LITRE COLD
3 LITRES BOILING AND 1 LITRE COLD
STIR THE SALT UNTIL DISSOLVED
ADD 500ML DYE TO THE BUCKET
AND STIR THE MIXTURE
ADD 500ML DYE TO THE BUCKET
AND STIR THE MIXTURE
Okay, so I got a bit carried away and tried out a few looks..
Look One:
Tie Dye Leggings
-hippie chic


THE BEFORE MUG SHOTS OF THE NOT-SO-STYLISH WHITE LEGGINGS
-FEATURING BAILEY WHO LEFT A BEAUTIFUL MUDDY PAW PRINT
-FEATURING BAILEY WHO LEFT A BEAUTIFUL MUDDY PAW PRINT
Step One


TAKING ELASTIC BANDS BEGIN TO RANDOMLY BOBBLE THE LEGGINGS
-CREATING VARIOUS SHAPES KIND OF LOOKS LIKE A CATERPILLAR
N.B THE MORE ELASTIC BANDS THE LESS DYED THE LOOK
-THEY PREVENT THE MATERIAL FROM ABSORBING THE FABRIC
N.B THE MORE ELASTIC BANDS THE LESS DYED THE LOOK
-THEY PREVENT THE MATERIAL FROM ABSORBING THE FABRIC

KIND-OF LOOKS LIKE A RAG DOLL/DOG TOY
-FOUND ANOTHER USE IF ALL FAILS
-FOUND ANOTHER USE IF ALL FAILS
Step Two
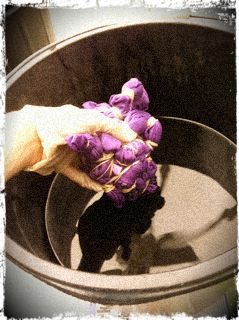
DUNK INTO THE DYE IN STAGES TO
CREATE A MULTI-TONAL DYE EFFECT
REPEAT THE STAGE EVERY FEW MINUTES
TO BUILD UP THE COLOUR
CREATE A MULTI-TONAL DYE EFFECT
REPEAT THE STAGE EVERY FEW MINUTES
TO BUILD UP THE COLOUR
Step Three

REMOVE FROM THE DYE
LEAVE TO ONE SIDE FOR A FEW
HOURS AND THEN RINSE
WITH COLD WATER
LEAVE TO ONE SIDE FOR A FEW
HOURS AND THEN RINSE
WITH COLD WATER
Step Four
Once completely dry remove elastic bands
Wash on a cool wash (following the instructions on your dye)
Taaadarrhhhhh


FRONT VIEW
THE BEHIND
Look Two:
Tie Dye T-Shirt
-I'm thinking for a bikini cover up?

FRONT VIEW
Look Three:
Ombre Blouse
-festival take over


MORE MUG SHOTS OF THE 'BEFORE LOOK'
Here comes the tie dye ...

I DIVIDED THE SHIRT INTO SECTIONS
WITH ELASTIC BANDS SO I COULD
FIGURE OUT HOW FAR TO DIP
THE BLOUSE
WITH ELASTIC BANDS SO I COULD
FIGURE OUT HOW FAR TO DIP
THE BLOUSE

LEFT THE BLOUSE IN THE DYE BUCKET TO
INTENSIFY THE COLOUR


INTENSIFY THE COLOUR
FRONT SHOT
BACK SHOT
N.B I used a 100% polyester blouse and so the dye just ran continuously.
I would advise a cotton based fabric as the end result would be much more of an ombre effect.
Look Four:
Tie Dye Shorts
-a revamp for a friends birthday

FIRST OF ALL THE JEANS WERE CROPPED
INTO SHORTS. THEN I DECIDED TO DYE
THEM COMPLETELY WITH THE PURPLE
DYE AND THEN TO ATTEMPT TO
OMBRE EFFECT
-DARK AT THE BOTTOM AND GRADUALLY
LIGHTER AT THE WAISTBAND
INTO SHORTS. THEN I DECIDED TO DYE
THEM COMPLETELY WITH THE PURPLE
DYE AND THEN TO ATTEMPT TO
OMBRE EFFECT
-DARK AT THE BOTTOM AND GRADUALLY
LIGHTER AT THE WAISTBAND

TAKING AN EMPTY SPRAY BOTTLE I
FILLED WITH NORMAL BLEACH AND
THAN BEGAN SPRAYING RANDOMLY
TO CREATE AN ACID EFFECT


I ALSO ATTEMPTED A PAIR
OF HIGH WAISTED FOR
ANOTHER FRIEND
-LOOK WENT FOR ACID ATTACK
ROLL ON THE BLEACH


FILLED WITH NORMAL BLEACH AND
THAN BEGAN SPRAYING RANDOMLY
TO CREATE AN ACID EFFECT
Finished Results
I'm not 100% happy with the final
results of this attempt so may
attempt a further soaking to
intensify and strengthen the colour
THE FRONT
THE DERRIERE
I ALSO ATTEMPTED A PAIR
OF HIGH WAISTED FOR
ANOTHER FRIEND
-LOOK WENT FOR ACID ATTACK
ROLL ON THE BLEACH
BUTTON UP
THE BACK
Look Five:
Tie Dye Short
-holiday partyingggggg
Step One
Dip the shorts into the dye as high as you want it to reach
Peg the waistband to the edge of the bucket
Leave to soak for about 10-15 mins
Step Two
When the first colour has dried slightly, and so will not run
Turn the shorts upside down and dunk the waistband into the second colour
Peg the bottom of the shorts to the edge of the bucket
Leave to Soak

Step Three
Remove from the dye
Leave to one side for a few hours and then rinse with cold water
Step Four
Once completely dry remove elastic bands
Wash on a cool wash (following instructions on your dye)

FRONT VIEW

THE BOOTY SHOT

Sneaky Tips
- To reserve labels and prevent them from being bleaches/dyed cover in vaselines
- Further funky your pieces up
- studs
- sequins
- fringe
- spraying with bleach
- fraying
- grating
- collar tips
Mucho Loves,
bb, xoxo
MEMO: REMEMBER TO COVER ALL SURFACES WITH BINBAGS AND NEWSPAPER IF DOING INSIDE AS YES IT CAN GET A TAD MESSY -ESPECIALLY IF YOU HAVE A FOUR-LEGGED FRIENDS AS YOUR LITTLE SHADOW
Mucho Loves,
bb, xoxo
These turned out so well! I adore the shirt, it looks amazing. Your blog photos all look so lovely and dreamy! I cant wait to see future posts.\
ReplyDeleteAnna
http://opshopaholic.blogspot.co.nz/
Thank you lovely !
DeleteLove you blog too!!
Muchos Smiles,
bb, xoxo
great post!! Tie Dye isn't really my style but I think it looks great on other people.
ReplyDeleteThanksss (:
DeleteLoveee tie dye and dip dye sooo much! Love this post x
ReplyDeleteGreat post!!!
ReplyDeleteD04DDA6D65
ReplyDeleteTakipçi Satın Al
Bedava Google Play Hesapları
Eti Mutlu Kutu Kodları
Minecraft Hile Kodları
Takipçi Hilesi
Temu Güvenilir mi
Backlink Satın Al
Cami Şamdanları
TT Ücretsiz Beğeni